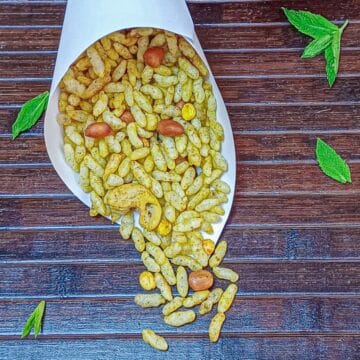
Murmura Chivda is a popular crispy, spicy and crunchy Indian tea time snack made with puffed rice (murmura), nuts, and a variety of spices. The unique twist to the classic version is this mint murmura chivda that gets ready in under 20 minutes.

Murmura chivda is a light, crispy and flavourful savoury snack that is easy to make at home. It is made by tempering various spices, curry leaves, nuts and then tossing it with puffed rice. It is a vegan and gluten free dish.
The best part of this puffed rice recipe is the addition of freshly ground mint leaves. Mint not only imparts a subtle green hue but also adds a refreshing flavour.
Chivda is a highly popular snack during Diwali and other festive occasions. It’s great to serve the guests as tea time snack or while waiting for the main meal as a light premeal snack.

Jump to:
This spicy puffed rice snack is an addictive crowd pleasing dish. It is Ideal for gatherings, game days or a cozy movie night.
Puffed rice is a versatile ingredient known for its high nutrient and low calorie content. It is used to make snacks such as chivda, bhel puri, popular south Indian breakfast dish puffed rice upma (uggani) and sweet treats like chikki and laddu.
Why is this the most loved snack?
It gets ready in less than 30 minutes.
It has a long shelf life of 1-2 months
Easy to make with basic Indian pantry ingredients
It is a nutrient and low calorie snack
It is an easy snack to prepare in bulk to serve guests in gatherings or for longer storage.
Ingredients

- Rice: Puffed rice to make this delicious snack.
- Spices and Nuts: Mustard seeds, cumin seeds, urad dal, dried red chillies, peanuts, cashews, red chilli powder, turmeric powder, roasted gram (roasted chana dal), roasted cumin powder, salt and amchur (dry mango powder).
- Herbs: Fresh mint leaves and curry leaves have been used here.
- Liquid: Little water to grind mint leaves to smooth paste. Oil to temper spices and nuts.
See the recipe card for quantities.
How to make murmura chivda?

Wash fresh mint leaves and grind them with a little water into a smooth paste in a mixer jar or blender.
Set it aside to use later.

In a large pan, heat oil over medium heat. Add peanuts and fry them until they become slightly browned.
Remove them from the pan and place in a bowl.

Now add mustard seeds, cumin seeds, and urad dal. Let them splutter.
Add red chillies and fry for a minute.
Add roasted gram (roasted chana dal), and curry leaves. Saute until the dal releases a nutty aroma.

Lower the heat and add turmeric powder, red chili powder, cumin powder, amchur powder and salt. Mix well.
Now add the ground mint, stir well and cook for 3-5 minutes until the raw aroma of mint vanishes.

Add the murmura (puffed rice) to the pan and mix thoroughly, ensuring the spices coat the puffed rice evenly.

Finally, add fried peanuts and cashews and mix well.
Cook for a few more minutes until everything is well combined.

Turn off the heat and let it cool to room temperature. Store the spicy puffed rice in an airtight container once it has cooled completely.
Enjoy the mint murmura chivda with a cup of masala chai or coffee.
Substitutions and Variations
Dried Fruits: Add dried fruits like raisins or cranberries along with nuts for a sweet and crunchy variation.
Nuts, Lentils and Seeds: Customise your chivda by adding almonds, or fry chana dal along with urad dal. Try your favourite seeds such as pumpkin seeds or sunflower seeds for extra flavour and crunch.
Spices: You could use chaat masala instead of dried mango powder (amchur) for a tangy flavour.
Herbs: Try fresh coriander leaves and green chilies along with mint for an extra flavour and spicy kick.
Coconut: Roasted coconut flakes or dried coconut slices add a lovely flavour and nutty taste.
Sugar: A spoon of powdered sugar adds a subtle sweetness and balances the tangy flavour of aamchur.

Storage
Once the chivda has cooled completely, store it in an airtight container to maintain its crispiness. Keep it away from the direct sunlight at room temperature probably in the kitchen cupboard or cabinet.
Tips and Tricks
Freshness of Ingredients: Use fresh murmura (puffed rice) to ensure a crispy texture. Stale or old puffed rice can result in a chewy or soft chivda.
Low Heat for Tempering: When tempering the spices, use medium low heat to avoid burning them. Burnt spices can impart a bitter taste to the puffed rice.
Even Coating of Spices: Ensure that the spices are evenly coated on the puffed rice. Toss the mixture gently to avoid breaking the puffed rice.
Roasting Time: Roast the murmura and other ingredients on a low flame. This ensures that the puffed rice doesn't get too hard and maintains a pleasant crunch.
Spice Levels: Adjust the spice levels according to your preference. If you like it spicier, add more red chili powder. Taste and adjust the salt accordingly.
Use a Wide Pan: Use a wide pan or kadai to ensure even mixing and roasting of the ingredients. This prevents overcrowding and allows for better heat distribution.
Roasted Cumin Powder: Use roasted cumin powder for an earthy and aromatic flavour.
Mint Stem: Use only mint leaves, discard the tough stems and stalks to avoid the risk of unwanted bitterness.
FAQ
Keep puffed rice away from moisture to keep puffed rice crispy for an extended period, Store it in an airtight container in a cool, dry place away from direct sunlight.
Yes, it is possible to crisp up soft puffed rice either through stovetop or oven method.
Stovetop Method: Heat a dry pan or skillet over medium heat. Add the soft puffed rice and stir continuously until it becomes crisp. Keep an eye to prevent puffed rice from burning.
Oven Method: Spread the soft puffed rice evenly on a baking sheet. Bake in the preheated oven (120C or 250F) for about 15-20 minutes, check and stir every 5 minutes to ensure even crisping. Keep an eye on the puffed rice to prevent burning.
Other regional names for this delicious snack are - masala mandakki, kumura chivda, murmura namkeen, sukha bhel.
KEEP IN TOUCH
Do let me know if you try this simple mint murmura chivda recipe. If you like this recipe kindly consider rating it using stars in the comment section or on the recipe card to help more people find this recipe online. You can stay up to date by following me on Facebook, Pinterest, Instagram or subscribing to my Youtube channel. Or why not subscribe to my blog and get simple recipes straight to your inbox?
📖 Recipe Card
Mint Murmura Chivda (Spicy Puffed Rice)
Equipment
- 1 Wide Steel Pan
Ingredients
1 Cup = 250ml ; 1 Tablespoon = 15ml ; 1 Teaspoon = 5ml
- ½ bunch Fresh Mint Leaves discard stem and stalk, and wash leaves thoroughly
- 3 Tablespoons Water adjust to get smooth paste
- 4 Tablespoons Oil
- ¾ Cup Peanuts
- ½ Teaspoon Mustard Seeds
- ½ Teaspoon Cumin Seeds
- ½ Teaspoon Urad Dal
- 2 Dried Red Chilles each broken into 2-3 pieces
- ⅔ Cup Roasted Gram/Pottu Kadalai/Putnala Pappu
- 1 sprig Curry Leaves
- 1 Teaspoon Chilli Powder adjust to taste
- ½ Teaspoon Turmeric Powder
- Salt as required
- ½ Teaspoon Amchur/ Dry Mango Powder
- 1 Teaspoon Cumin Powder/ Jeera Powder
- 10 cups Puffed Rice
- 6-7 Roasted Cashews
Instructions
- Wash fresh mint leaves and grind them with a little water into a smooth paste in a mixer jar or blender.½ bunch Fresh Mint Leaves, 3 Tablespoons Water
- Set it aside to use later.
- In a large pan, heat oil over medium heat.4 Tablespoons Oil
- Add peanuts and roast them until they become slightly browned.¾ Cup Peanuts
- Remove them from the pan and place in a bowl.
- Now add mustard seeds, cumin seeds, and urad dal. Let them splutter.½ Teaspoon Mustard Seeds, ½ Teaspoon Cumin Seeds, ½ Teaspoon Urad Dal
- Add red chillies and fry for a minute.2 Dried Red Chilles
- Add roasted gram (roasted chana dal), and curry leaves.1 sprig Curry Leaves, ⅔ Cup Roasted Gram/Pottu Kadalai/Putnala Pappu
- Saute until the dal releases a nutty aroma.
- Lower the heat and add turmeric powder, red chili powder, cumin powder, amchur powder and salt and mix well.1 Teaspoon Chilli Powder, ½ Teaspoon Turmeric Powder, Salt, ½ Teaspoon Amchur/ Dry Mango Powder, 1 Teaspoon Cumin Powder/ Jeera Powder
- Now add the ground mint, stir well and cook for 3-5 minutes until the raw aroma of mint vanishes.
- Add the murmura (puffed rice) to the pan and mix thoroughly, ensuring the spices coat the puffed rice evenly.10 cups Puffed Rice
- Finally, add roasted peanuts and cashews and mix well.6-7 Roasted Cashews
- Cook for a few more minutes until everything is well combined.
- Turn off the heat and let it cool to room temperature.
- Store the spicy puffed rice in an airtight container once it has cooled completely.
- Enjoy the mint murmura chivda with a cup of masala chai or coffee.
Notes
- Freshness of Ingredients: Use fresh murmura (puffed rice) to ensure a crispy texture. Stale or old puffed rice can result in a chewy or soft chivda.
- Low Heat for Tempering: When tempering the spices, use low to medium heat to avoid burning them. Burnt spices can impart a bitter taste to the chivda.
- Even Coating of Spices: Ensure that the spices are evenly coated on the puffed rice. Toss the mixture gently to avoid breaking the puffed rice while evenly distributing the spices.
- Roasting Time: Roast the murmura and other ingredients on a low flame. This ensures that the puffed rice doesn't get too hard and maintains a pleasant crunch.
- Spice Levels: Adjust the spice levels according to your preference. If you like it spicier, add more red chili powder. Taste and adjust the salt accordingly.
- Use a Wide Pan: Use a wide pan or kadai to ensure even mixing and roasting of the ingredients. This prevents overcrowding and allows for better heat distribution.
- Roasted Cumin Powder: Use roasted cumin powder for an earthy and aromatic flavour.
- Mint Stem: Use only mint leaves and discard the tough stems and stalks to avoid the risk of unwanted bitterness.
Nutrition
Related
Looking for other teatime snack recipes? Try these:
Pairing
These are my favorite dishes to serve with mint murmura chivda:

Welcome to Flavours Treat. I share vegetarian recipes made with wholesome, mostly fresh ingredients. Every recipe has easy-to-follow instructions with process shots (detailed step-wise pictures), a short video and lots of tips to help your cooking journey. Read more







Leave a Reply